Subtitle Text Elements
Subtitle stands for a text placed over video, usually at the bottom of the frame, used to translate foreign language dialogue, or to identify the scene. Subtitles can have up to 11 text lines. Usually, opnly the last two rows are used, i.e. rows 10 and 11. An exception is made for the Zero subtitle, which is displayed mostly on the top few rows.
When we talk about editing subtitles, we use the following terms:
Current subtitle |
The presently edited subtitle. |
Current line |
The line where the cursor is presently located. |
Current word |
The word in which or next to which the cursor is currently located. |
The subtitle editing commands can target different elements – a character, a word, a whole line, even the whole subtitle.
Navigation within a Subtitle
Using the Keyboard
You can navigate within a subtitle in a standard way using the arrow keys, home, end, etc.
EZTitles allows you to use two fonts – Font 1 and Font 2. They can be selected by using ![]() or
or ![]() toolbar buttons or from the Format/Font menu. The default font is set in the Project Settings/Subtitles menu.
toolbar buttons or from the Format/Font menu. The default font is set in the Project Settings/Subtitles menu.
When the text you type reaches the set limits (safe area or number of characters per line), the last word is transferred to the next row and it becomes the current row.
If you want to start typing a new row before the text has reached the end of the line, you can use Enter.
The following keys and shortcut keys are used for Keyboard navigation:
|
Cursor moves by one character in the chosen direction limited within the current subtitle text area. |
Ctrl+ |
Cursor moves one word to the left. |
Ctrl + |
Cursor moves one word to the right. |
Home |
Cursor moves to the beginning of the current row. |
End |
Cursor moves to the end of the current row. |
Ctrl+Home |
Cursor moves to the beginning of the current subtitle. |
Ctrl+End |
Cursor moves to the end of the current subtitle. |
F11 |
Focuses the comment field. |
F12 |
Returns the cursor directly to the editor area. |
Using the Mouse
Clicking the left mouse button on a specific position in the current subtitle field moves the cursor to that position. If you click the left mouse button on the left or on the right safe area the cursor will be positioned respectively before the leftmost character or after the rightmost character of the row the cursor was on.
Navigation between Subtitles
Using the Keyboard
The keyboard navigation between subtitles is done by using the following keyboard shortcuts.
PgUp |
Moves to previous subtitle. |
PgDn |
Moves to the next subtitle or inserts new subtitle, if pressed in the last subtitle of the project. |
Ctrl+PgUp |
Jumps to the first subtitle in the Preview List. |
Ctrl+PgDn |
Jumps to the last subtitle in the Preview List. |
Ctrl+G |
Moves you to a subtitle specified in a pop-up dialog. This command may be invoked from the respective toolbar button, as well as from the Edit/Go to menu. |
Alt+PgUp |
Jumps to the previous subtitle with attached to it comment. |
Alt+PgDn |
Jumps to the next subtitle with attached to it comment. |
Alt+Ctrl+PgDn |
Jumps to the last subtitle with non empty time code |
Using the Mouse
Left-clicking on the previous subtitle field selects that subtitle.
Left-clicking on the next subtitle field selects that subtitle or inserts new one.
Using mouse scroll in both directions changes the current subtitle with the previous or the next one.
F4 |
Plays the current subtitle and pauses the video when it reaches the subtitle's out cue (e.a subtitle's end). |
PgDn |
Switches On/Off the Play Subtitle on Change. When the current subtitle is changed in Edit mode (PgUp, PgDwn, click on the preview list, etc), the new subtitle is automatically played. When turned on, a small |
Entering and Modifying Text
You can enter or modify text in Insert or Overwrite mode using the keyboard. If you have selected a portion of the text when you type, the new text will overwrite the selection.
Insert and Overwrite Modes
You can switch between Insert and Overwrite modes with the Insert key on the keyboard. The Insert typing mode means that all that you type will be inserted in the text at the current cursor position.
The Overwrite mode means that your typing replaces the text at the current cursor position.
Often, when you have already typed the text, it becomes clear that you need to split the line or to arrange the words within the subtitle differently.
You can move words within the subtitle using the following shortcut keys:
Ctrl + |
Moves the first word of the current row to the end of the previous one. |
Ctrl + |
Moves the last word of the current row to the beginning of the next one. |
Alt+Ctrl+ |
Moves the whole subtitle one row up. |
Alt+Ctrl+ |
Moves the whole subtitle one row down. |
Alt + Shift + (Fine Move Subtitle Up) |
Moves the whole subtitle up with the vertical offset configured at Edit->Preferences->Miscellaneous menu. |
Alt + Shift + (Fine Move Subtitle Down) |
Moves the whole subtitle down with the vertical offset configured at Edit->Preferences->Miscellaneous menu. Note: Please mind that the Fine Move Subtitle Up(Down) commands work for Open/Native and Digital Cinema projects only. |
Enter |
Splits current row into two lines with the cursor as the dividing point and jumps to the second row. If the cursor is at the end of the row, the command inserts an empty new line after the current one. |
Backspace |
If the cursor is at the beginning of the row, it merges the current row with the previous one. |
Delete |
If the cursor is at the end of the row, it merges the current row with the next one. |
Alt+ Num |
Shifts the whole row one character left/right. |
Alt+Ctrl+Num |
Shifts the whole subtitle one character left/right. |
Deleting Text in a Subtitle
The following shortcuts can be used to delete the text in a subtitle:
Delete |
Deletes the character to the right of the cursor or the selected text. |
Backspace |
Deletes the character to the left of the cursor or the selected text. |
Ctrl+Backspace |
Deletes the whole word from the mouse pointer to the word's start. |
Ctrl+Delete |
Deletes current word. |
Alt+Space |
Clears the text on the selected row without deleting the row itself. |
Shift+Delete |
Deletes the text from the cursor to the end of the current row. |
Alt+Delete |
Deletes the current row, remaining text lines above the deleted one will be pushed down. |
Alt+Ctrl+Space |
Clears the text of the subtitle. |
Alt+Ctrl+Backspace |
Deletes the selected subtitle entirely. |
EZTitles allows you to insert different, frequently used accents or special characters using the shortcuts mentioned in the Accents, special characters topic as well as directly from the Edit/Insert menu.
If the character you need to insert is not among the available there, you can use Insert Symbol tool from Edit/Insert/Insert Symbol or by simply clicking on the ![]() icon on the toolbars:
icon on the toolbars:
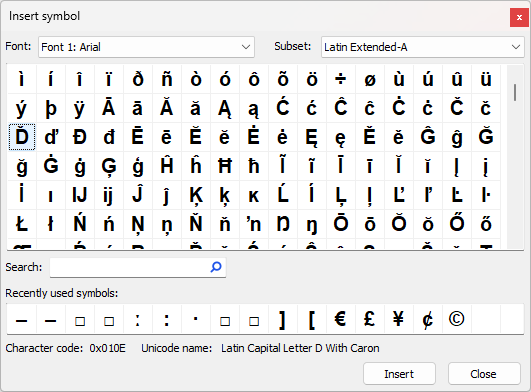
All characters and symbols supported by the currently selected font will be displayed in the main part of the window. You can insert any of them in EZTitles by simply double clicking the selected character or pressing the Insert button.
From the Subset drop-down menu you can select specific category of characters. Some of the fonts support the full range of Unicode characters and it can be quite difficult to quickly find the one you're looking for. You can filter the number of displayed characters by choosing a specific category from the Subset drop-down menu. For example the letter "я" is part of the Bulgarian and Russian alphabets which are languages using Cyrillic script. It will be much easier to select Cyrillic on the Subset drop-down and quickly locate it than scrolling down through the whole number of available characters otherwise.
For your convenience the Insert Symbol tool does also remember the last 15 inserted symbols.
Note: Please mind that it isn't necessary to go through all characters before finding the specific one you're looking for. You can always type in the Search box its name to display all characters which are related to it in any way. For example entering "degree" in the Search box will bring a list of a couple of symbols which contain degree in their names.
The following commands can be used to directly modify one or two consecutive subtitles:
Alt+Ctrl+Ins |
Inserts a new subtitle after the current one. |
Alt+Shift+Ins |
Inserts a new subtitle before the current one. |
Alt+Ctrl+Enter |
Splits selected subtitle into two subtitles with the cursor as the dividing point. The first subtitle keeps its in-cue and receives a new out-cue, which is automatically calculated on the basis of the remaining text and the defined reading speed. The second subtitle keeps its old out-cue and receives an in-cue, which corresponds to the minimum interval between two subtitles (but not greater than the out-cue). If the cursor is placed at the beginning or the end of the subtitle text the first or respectively the second subtitle is created empty at minimum duration. |
Alt+Ctrl+ – |
Moves the text from the cursor position to the end of the current subtitle into the next subtitle without affecting the timecodes of either. |
Alt+Shift+ – |
Moves the text from the cursor position to the beginning of the current subtitle into the previous subtitle without affecting the timecodes of either. |
Word To Previous/Next Subtitle |
Moves the first/last word to previous/next subtitle. |
Move text to Previous/Next subtitle and add dash |
Moves the first/last word to previous/next subtitle and inserts dash to the bottom or both text lines. |
Merge with Previous/Next add dash |
Merges currents subtitle with the previous or next subtitles and inserts dash to the bottom or both text lines. |
Alt+Ctrl+= |
Merges the current subtitle with the next one. The merged subtitle keeps the in-cue of the first subtitle and receives the out-cue of the second one. |
Merge with Previous |
Merges the current subtitle with the next one. |
Insert dialogue dashes |
Inserts dash at the beginning of both text lines in the current subtitle. If there were dashes already, they will be deleted instead. |
Fit text to one row |
Wraps subtitle's text on a single line if the text can fit on it. These kind of subtitles are indicated by the following icon below the text in the main editor. |
Note: The behavior of Move text to Previous and add dash, Move text to Next and add dash, Merge with Next add dash, Merge with Previous add dash and Insert dialogue dashes commands can be tuned further. For more details please refer to the Command Options/ Dialogue in Subtitles topic.
Some commands don't have keyboard shortcuts assigned to them by default but you can always assign new or change the existing shortcuts.
Selecting Text in a Subtitle
Using the Keyboard
A portion of text within a subtitle is selected by simultaneously pressing Shift and one of the following keys: ![]() ,
, ![]() ,
, ![]() ,
, ![]() .
.
Using the Mouse
Selection within the subtitle can also be done with the mouse by pressing and holding the left mouse button while moving it along the text. Double clicking with the left mouse button selects the current word. The whole text of the subtitle is selected with Ctrl+A, or using the Edit/Select All menu.
The next dialog is used to change the case of already typed in letters:

Change Characters Case
The dialog is executed using Edit/Change case menu item. Here you can specify the kind of the operation (uppercase or lowercase) and to what it should be applied to.
If Current row is chosen and there are more than one rows selected, the operation is applied to all selected rows.
There are also keyboard shortcuts. The default ones are:
Ctrl+U |
Changes all selected letters to UPPERCASE. |
Ctrl+B |
Changes all selected letters to lowercase. |
Alt+Ctrl+U |
Changes all letters on the current line to UPPERCASE. |
Note: Please mind that the Change Case command executed from the Edit menu works only for the current subtitle. If it's needed to change case for more than one subtitle simultaneously, the Titles/Change Case options could be used instead.
Position the Text in Teletext or Closed Captions Mode
When you are working in Teletext or Closed Captions mode or you can use additional formatting commands, specific to this mode.
Move Subtitle Text |
Using these commands you can move whole subtitles or subtitle rows anywhere over the picture. The following commands are available: Alt+Num Alt+Num Alt+Ctrl+Num Alt+Ctrl+Num Alt+Ctrl+ Alt+Ctrl+ After using one of these commands the subtitle becomes Not Aligned. |
Not Aligned Subtitles |
Uses to indicate that the subtitle rows are positioned manually by using the command explained above (if the command is not visible you can find it using the Customize command from the toolbar context menu or Tools/Customize...). |
Box Subtitles |
If you want to draw a black box around subtitles, you can accomplish this by pressing the Alt+Ctrl+B key combination. |
Double Height |
Use this command to apply/remove the Double Height setting to your current subtitle text selection or a whole subtitle rows. The shortcuts are Ctrl+D and Alt+Ctrl+D. Double height is available only in Teletext projects. |
You can add comments to the subtitles for the person revising your work - pointing out a source of reference or any information you consider relevant. This feature greatly improves the coordination between the subtitler and the editor. The comment field can be located on the right of the workspace, docked, or floating wherever you wish to place it. You can Switch the Comment field on and off by selecting the command from the View menu.
Switching between Editor and Comment field
If you are in the editor area of the current subtitle and you want to add a comment you can do so with a mouse click in the Comment Field or using the F11 keyboard shortcut.
If you want to move back to the editor field, use the F12 keyboard shortcut.
Hidden Subtitles
By Hidden we call those subtitles which exist in the current project but must not be exported in the output file but for some reason shall not be entirely deleted. “Hidden” subtitles will not be exported, but will be saved in the .ezt file.
All subtitles marked as “hidden” will appear as crosshatched in the Preview list.
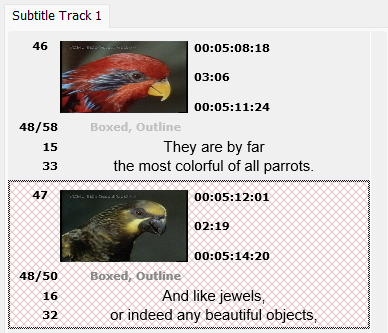
You can “hide” any subtitle by either right clicking on it in the Preview list and using the “Hide” option, or by using the Titles/Hide-Unhide.