Formatting Text
The following formatting options can be applied to various parts of the subtitle. The commands described below are placed in Format menu and some of them are available as toolbar buttons.
Font Number
EZTitles allows the use of two fonts – Font 1 and Font 2. The attributes of these fonts depend on the project type and mode and are defined in Project Settings/Fonts.
Every row in a subtitle could have a different font number. The font number is set by using ![]() or
or ![]() toolbar buttons, the corresponding commands in Format menu or the Format dialog described later in this topic. When the cursor is positioned in the main editor, the corresponding font number button is highlighted indicating the font number assigned to the current row.
toolbar buttons, the corresponding commands in Format menu or the Format dialog described later in this topic. When the cursor is positioned in the main editor, the corresponding font number button is highlighted indicating the font number assigned to the current row.
Italic
Selected part of the text can be made italic by using the Ctrl+I shortcut or ![]() button on the toolbar. To make the whole row italic you can use Alt+Ctrl+I instead. In addition, the Subtitle Italic command may be used to simultaneously make all of the subtitles' text in italics but you may want to assign a shortcut to it first.
button on the toolbar. To make the whole row italic you can use Alt+Ctrl+I instead. In addition, the Subtitle Italic command may be used to simultaneously make all of the subtitles' text in italics but you may want to assign a shortcut to it first.
Italics are not allowed in Teletext projects by specifications and when in PAC mode, italic control codes are inserted before and after the text, which are then rendered as spaces on the screen.
EZTitles supports the Underline formatting in Open, Digital Cinema and Closed Captions modes. The command is available at the Format menu, after assigning shortcut for it or by dragging its icon ![]() on the toolbar.
on the toolbar.
Please keep in mind that underline is typically avoided by most subtitle delivery guidelines and only a handfull of subtitling formats support it: .ezt/.eztxml, .890, EBU STL(in open subtitles only), XLS, Subrip (.srt), Rich Text Format (.rtf), DLP Cinema XML, DCDM XML, SubStation Alpha (ssa/ass) as well as all Image-based exports and DVB subtitles.
Alignment and Horizontal Position
Every subtitle can have different alignment. The alignment of the current subtitle is selected by using one of the following toolbar buttons or the corresponding commands in the Format menu:
|
Left, Right and Center |
|
Center-left aligned |
|
Not aligned. Used in teletext mode only. The text is positioned by using manual move commands. |
When the cursor is in the main editor, the corresponding button is highlighted indicating the alignment of the current subtitle.
EZTitles extends the horizontal positioning of subtitles with justification and position features:
Justification - defines the layout of the text in a text block with more than two lines to be either lined up by their left or right edges or their center.
|
Left, Right and Center position |
Position - specifies the horizontal position of the subtitle text on the screen. It can be moved to the left, right or to the center of the screen.
|
Left, Right and Center justification |
These features are extremely useful when working on Closed Captions or Teletext projects for fast and accurate positioning of the text according to the required rules i.e. next to the speaker or the sound source.
You can change the justification/position pressing the corresponding buttons on the toolbar. If the justification needs to be changed for more than one subtitle simultaneously, it is much easier to do it by using the Justify Rows option from Titles/Format.
Note: Justification and Position options can be freely used in Open/Native, Digital Cinema, Teletext and Closed Captions modes. Please be aware that most of the subtitle file formats do not support all Justification/Position combinations.
Individual Row Position
There are situation when you need to change the position of a single row only. You can do it by using the following commands available in Format menu:
|
Left, Center and Right position |
These commands are not placed on the toolbars when the software is installed. If you use them frequently and you want them available on the toolbars please check the following topic: Add/Remove buttons to the toolbars
Vertical Alignment
You can align the current subtitle to Top, Vertical Center or Bottom by clicking on the corresponding toolbar buttons ![]() ,
, ![]() ,
, ![]() . When the cursor is in the main editor, the corresponding button is highlighted indicating the vertical alignment of the current subtitle.
. When the cursor is in the main editor, the corresponding button is highlighted indicating the vertical alignment of the current subtitle.
Colors - Foreground and Background
EZTitles allows you to change the color and the background of the currently selected text by using the Color keyboard shortcuts or by clicking the respective button on the toolbar (if the color buttons are not visible you can access them using the Customize command from the toolbar context menu or Tools/Customize).
When working on a Teletext project and change the text's or background's color, then before and after your selection EZTitles inserts control code characters, which render as spaces on the screen.
For your convenience there are Color styles commands that allows you to set both foreground and background colors.
Color commands are available when creating DVD subtitles but some rules must be taken into account: About DVD Subtitles Rendering and Colors.
The default orientation of the text is horizontal from the left to the right but it can easily be changed. The commands on the Format menu, Format/Text Direction, respectively do the following:
|
Changes the orientation of the text from horizontal to vertical. The first symbol will be inserted at the top, the next just below it and so on. The whole text block appears as rotated 90° clockwise. |
|
Switches the text's orientation from vertical to horizontal. |
Text's writing direction can be switched from LTR (left-to-right) to RTL (right-to-left) directly from Project Settings/Fonts by activating or deactivating the respective right-to-left option for the specific font.
Note: Please mind that only some of the fonts supports right-to-left languages and scripts or vertical text. Wikipedia is a good source for checking the language support of Windows built-in fonts.
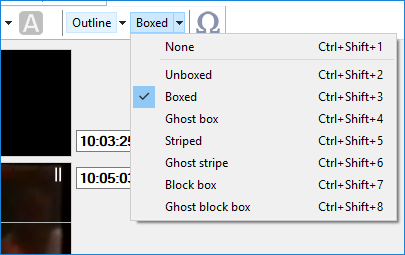
Every subtitle could have a different presentation style - box, outline, shadow, etc.
Box effects:
None |
No box effect is applied. |
Box |
Draws a box behind the text. |
Ghost boxed |
Draws a transparent box behind the text. |
Striped |
Draws stripes behind the text across the screen. |
Ghost stripe |
Draws transparent stripes behind the text across the screen. |
Block boxed |
Draws a box with a width adjusted to the longest subtitle line. |
Ghost block boxed |
Same as Block boxed, but the box is transparent. |
Outline/Shadow effects:
None |
No outline or shadow effect is applied. |
Outline |
An outline around the characters is drawn. |
Dropshadow |
A shadow behind the characters is drawn. |
Outline dropshadow |
Combines outline and dropshadow. |
The presentation styles can be selected by using the Presentation Control Shortcuts or the corresponding drop-down buttons on the toolbar:
The parameters of the above mentioned effects are defined in Project Settings/Effects.
Presentation styles are available when working in Native/Open, PAC/Open or Digital Cinema modes.
You may open the format menu by right clicking on the subtitle in the editor and selecting Format.... The following dialog box will appear:

Right-click Format
Selected options are applied to the current subtitle only. NO CHANGE means that the corresponding attributes of the selected text, row or current subtitle will not be changed
As seen in the example above, the box will set Font 2 to the current row and the presentation style to Unboxed, Outline of the current subtitle.
Similar formatting options are available using Titles/Format menu. The difference is that the Titles/Format option is used when you need to apply global changes affecting all the titles in your file or defined range.