Export multiple files command is intended to help you split your subtitles in several files according to specified timecode ranges. The command works with all file formats supported by EZTitles.
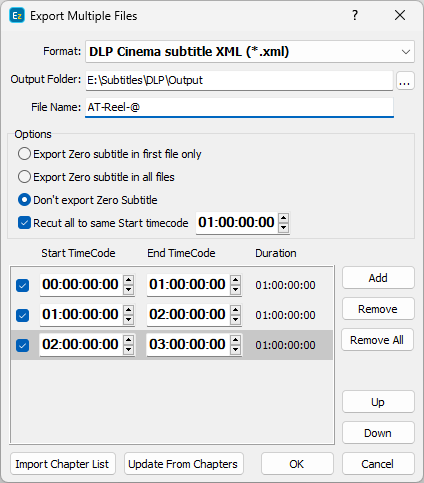
and can be accessed from the (Import/Export)/Export Multiple Files drop-down menu. The following dialog window shows up:
General parameters
You can choose the specific output format by pressing the Select button. The Config button right next to it opens the configuration options associated with the selected format.
please mind for some of the file types those options will be opened when you press the OK button. If you need some help for the selected file format please refer to the corresponding item in Export Subtitles topic.
Using the browse ![]() you can select the destination folder. The File Name will be automatically filled with the name of the current project but it can be changed if needed.
you can select the destination folder. The File Name will be automatically filled with the name of the current project but it can be changed if needed.
The individual files will be named by adding a sequential number to the file name specified here.
If you want to use a custom naming pattern you can place "@" character anywhere in the specified name. It will be replaced with the sequential number.
For example "Part @ Wildlife" will result in the following files: "Part 1 Wildlife.txt", "Part 2 Wildlife.txt", etc.
please mind when you choose to export to DLP Subtitle XML or DCDM (SMPTE 428-7-2007) XML each individual reel will be saved in a separate subfolder containing the XML or PNG subtitles, the font files and presentation lists if you have activated the respective options.
Timecode ranges
The subtitles will be split into couple of consecutive files by specifying Start and End Timecode points for each individual output file. It is not necessary that the timecode ranges are consecutive.
There could be gaps or you can exclude some of them from the export by clicking the respective check box. Add/Remove and Up/Down buttons could be used to arrange the ranges.
When the command is executed for the first time and you have defined Chapters the Start/End Timecodes are automatically filled from the chapters list.
Then you can modify the ranges but you can always revert them to the defaults by using the Update From Chapters button.
Loading Start/End points from external file is another useful feature. Use the respective Import Chapter List button and browse to the file containing these details.
Almost any plain text file can be used for this purpose and the only requirement is to have one timecode per line. A simple list of timecodes or a file similar to the following example can be used::
Chapter 1: 02:00:00:00
Chapter 2: 02:16:24:00
Chapter 3: 02:36:36:00
Options
Export Multiple Files command allows you to export the Zero Subtitle from your project. The following three options available are:
Export Zero subtitle in first file only |
The Zero Subtitle will be saved in the first - leading file. |
Export Zero subtitle in all files |
The Zero Subtitle will be saved in all files. |
Don't export Zero Subtitle |
The Zero Subtitle will not be exported. |
Recut all to same Start Timecode
Finally, you could consider using the Recut all to same Start Timecode when all the output files need to start from the very same Start Timecode point.
For example looking at the image above the subtitles in the first file will be offset by +01:00:00:00, the second one will stay the same and the third will be moved backward by -01:00:00:00 or in other words by the difference between the values specified by the Recut all to same Start TC and the Start Timecode for each individual file.