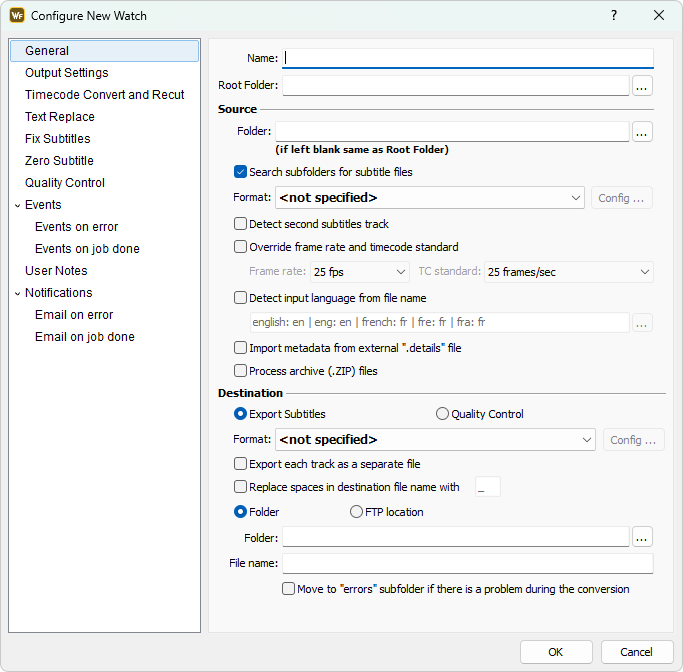
The Watch Folder requires a Name, which can be typed in the corresponding box. The Watch Folder is identified by this name and it should be unique.
Root Folder is the location where the Watch Folder will be placed. If a new one is created the program will create the necessary directory structure and save the configuration there.
Source
Detect second subtitles track |
Detects if there are any subtitles with overlapping subtitles and if there are automatically creates second subtitle track. If the selected output supports subtitles with overlapping timings, then subtitles from both the main and secondary track will be exported. Otherwise only the main subtitle track will be exported and the Watch Folder will indicate it by throwing a warning. More about the second subtitle track can be found in the Secondary Subtitles Track topic. |
Folder |
This is the input folder. The program will monitor this folder for new files. By default this field is blank which means that the root folder is used. |
Format |
The input file format. First press the Select... button and a list with all supported file formats will be displayed, similar to the Import Subtitles one. Once the particular subtitle format is selected and you press the OK button additional configuration dialog will pop-up with the Import configuration options available for this format. If you are editing an already existing Watch Folder, pressing the Config button will display these options again. |
Override timecode standard and frame rate |
If the input file is created for different video frame rate or timecode standard than the output you should select this option. Then you will be able to select a new frame rate and timecode standard. As part of our Metadata pass-through concept, the Watch Folder's allows you to use the Frame Rate indicated in the source file when you select the <from_source> option. Please make sure to also select Timecode Format in case the source doesn't contain information about it. This option works in conjunction with timecode conversion discussed in Timecode Convert and Recut. |
Detect input language from |
When the option is enabled, language identification tags found in input file's metadata will not be used. Instead EZConvert tries to identify the language of the subtitles by looking for language identification tags in input file's name only. The language identification tag found in input file's name will be replaced in the output file by the corresponding to it RFC 4646 language code. You may use the |
Import metadata from external ".details" file |
Allows metadata from external .details file to be passed to the output. The details file must be copied in Source folder and must have the same name as the input file. For example, if the input is called MyFile.srt, the details file should be then named MyFile.details. Conversion will stop with an error if the .details file isn't found in the Source folder or if its name is different. Note: For details referring to the contents of the .details, please check sample_details.details in EZConvert's installation folder: |
Process archive (.zip) files |
Enables conversion of multiple files of the same format and compressed into a .ZIP archive into individual tracks of an .ezt/.eztxml project. For more details, please refer to this topic. |
Destination
There are several output types that could be selected:
Subtitles file |
Use this option if your are going to convert into a regular subtitle file and then press the Select button to specify its format. A list similar to the one for Export Subtitles will be opened. Then the Config button again will summon the format's specific output options. |
Quality Control |
This job type doesn't produce any output files. It checks the input file against the criteria specified in the Quality Control page. If the file does not pass the test an error is generated. |
Export each track as |
Exports all individual tracks of a multi-track project as separate files named after the input file: <input file name> <track name>. If the selected output format requires language to be specified, the language from track's configuration will be used. |
Replace spaces in |
All spaces from input's file name will be automatically replaced by the symbol specified in the respective edit box. Symbols included in the Windows file naming convention are not allowed. |
Export each track as a separate file |
Allows each subtitles track from an .ezt or .eztxml file to be exported as a stand-alone file. The output file names are concatenation of the input file name and each track name. |
Output location
The output file can be placed in a local/network folder or on a remote FTP server. In the first case you can select the folder by using the "..." button on the right or typing the path by hand in the corresponding field.
If you have selected FTP Location then you need to enter a valid FTP address in the following format:"yourdomain.com/output_folder" or use an IP address: "192.168.10.100/output_folder" as well as Username / Password to grant access to the remote site.
File name
By default the output file name is the same as the input one with changed extension. Using the File name field you can override this rule and apply your own patterns.
The “@” character is replaced by the input file name without extension. There must be one “@” in the File name field. This way you can change the file extension, add prefix or suffix, etc.
If the Move to errors subfolder... option is clicked then when the conversion generates an error the output file will be moved to a subfolder named Errors in your output directory.
If the Errors folders doesn't exist the Watch will automatically create it.
Wildcards available for destination file's name
EZConvert supports couple of wildcards which can be used to generate destination file's name depending on the contents and type of the input file.
@ - will be replaced by input's file name.
When the source file comes in the .ezt or .eztxml formats, then attributes from the Details associated with these files can be used:
%DETAILS_OTITLE% - replaced by the content of the Original Title field in the input .ezt or .eztxml file.
%DETAILS_OEPISODE% - replaced by the content of the Original Episode field in the input .ezt or .eztxml file.
%DETAILS_OLANG% - replaced by the content of the Original Language field in the input .ezt or .eztxml file.
%DETAILS_TTITLE% - replaced by the content of the Translated Title field in the input .ezt or .eztxml file.
%DETAILS_TEPISODE% - replaced by the content of the Translated Episode field in the input .ezt or .eztxml file.
%DETAILS_TLANG% - replaced by the content of the Translated Language field in the input .ezt or .eztxml file.
%DETAILS_TAPEID% - replaced by the content of the Tape ID field in the input .ezt or .eztxml file.
%DETAILS_CODE% - replaced by the content of the Reel Code field in the input .ezt or .eztxml file.
%DETAILS_REVISION% - replaced by the content of the Revision field in the input .ezt or .eztxml file.
Another format which is known for carrying and using similar metadata information is the PAC. Metadata is preserved in the form of Zero Subtitle. Typically Zero Subtitle contains at least information about the Language and Story but there is no uniform standard what a Zero Subtitle must contain or look like. Nevertheless, EZConvert can still use the contents of the zero subtitle to generate destination file name. In this case, the attribute from the zero subtitle must be enclosed in %. For example, if a Zero Subtitle contains:
Story: TestStory
Episide: Episode-1
Lang: BGR
For destination file's name we can enter: %Story%_%Episode%_%Lang%. As a result the output file will be named: TestStory_Episode1_BGR
Please note that the % sign is mandatory and should not be missed, it should be present at all times. If the percent sign must be used as part of the destination file's name, then it must be escaped by another percent, like this:%%.