The timeline is usually docked at the bottom of the screen. It contains two tracks: the upper one is the audio graph and subtitles track while the bottom one is the video track.
The ribbon with the timecode is placed between the tracks. At the bottom is the scrollbar used to navigate through the video.

Timeline
The orange vertical lines represent the shot changes. They are also displayed on the video track with the corresponding image from the movie. More about activating and using the shot changes you can find here.
The vertical red lines shows the current video position. You can drag the line using the mouse to navigate through the video in close range. To move faster use the scroll bar at the bottom. The two numbers displayed above it show the distance in video frames from the previous and next shot changes which can be very useful when meeting somehow more complex requirements concerning the start or end of a subtitle relative to the distance from the shot change, for example:
"If dialogue starts between 8-11 frames (green zone) before the shot change, the in-time should be moved up to 12 frames before the shot change."
The small lock ![]() button on the left side of the timecode bar locks the scrollbar with the video. When unlocked moving the scrollbar will not change the video position.
button on the left side of the timecode bar locks the scrollbar with the video. When unlocked moving the scrollbar will not change the video position.
The mouse wheel also moves one frame forward/backward. Alt or Ctrl keys pressed together with the mouse wheel are used for fast scrolling through the video.
Pressing the ![]() button at the upper left corner brings up a menu with the following options:
button at the upper left corner brings up a menu with the following options:
Mode |
The timeline can be displayed in four different layouts: Shot Changes Sequential Thumbnails Strip of Frames Detailed |
Audio Graph |
Several options to customize the audio track explained below. |
Zoom |
Several zoom options are available. The timeline is zoomed in horizontal direction. |
View |
Options to show/hide different elements of the Timeline the Audio Graph, the Video thumbnails track and the Subtitling Assistant analysis data indicating the processed by the Assistant parts of the video. You may also find how the Subtitling Assistant changes the timeline in the sub-topic below. |
Audio Graph and Subtitles Track
The audio graph represents the sound samples in graphical way. It helps you to easily determine where the speech starts or ends.
If the audio is too loud or silent and the peaks are not seen clearly you can use the vertical slider on the left side to control the samples scale. Moving it upwards will increase the height of the audio samples on the line and the peaks will become more visible.
The subtitles are displayed as rectangles on the timeline to represent their position in time. You can easily navigate through the subtitles by clicking the titles on the graph.
The current subtitle is marked in blue and is also displayed in the Editor area. You can get more information about each subtitle, its number, in/out cues and text, by simply pointing over it with the mouse.
A sequence of vertically positioned triangles may be present to the left and right of the subtitle. They indicate that the subtitles' In-Cue (to the left) or Out-Cue (to the right) are snapped to a shotchange.
You can adjust the time code of the subtitles directly from the timeline: drag the whole subtitle to a new position using the mouse, or if you want to change in- or out-cues only you can drag just the left or the right bounds.
Holding the Ctrl button while moving the cue of subtitles that are already on the min. interval will allow you move them closer essentially overriding the min. interval.
The same will happen when moving one of the Cues around a shot change while Snap to shot changes on set cues option is on: holding Ctrl will allow you to override it and move the cue closer to the shot change.
If the Snap to Shot Changes option in Preferences is activated, the drag operation will automatically snap to shot changes boundaries.
Clicking the ![]() button and then selecting Audio Graph brings up a drop-down menu with additional options:
button and then selecting Audio Graph brings up a drop-down menu with additional options:

Additional Audio Graph options
Channel View |
In some cases the speech may come from the left or the right audio channel only or it may be a lot more easier only one of the Audio channels to be represented on the Audio Graph. "Mixed Channels" option displays the samples on one, common for the two audio channels line. |
Use Speech Filter |
Activates additional voice filter to reduce the background noise and sound effects and enhances the peaks. |
Clicking with the right mouse button will open context menu that contains some commands related to working with the Timeline.
The Timeline will change its colors when the video is analyzed by the Subtitling Assistant to signify which parts have been processed already, which are still being analyzed as well as those that were not included for analysis when processing the video in segments:
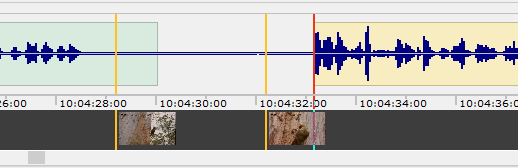
Timeline will be filled in light-green to signify that this part of the video has already been analyzed, the pale-yellow color signifies the parts which are yet to be analyzed while parts without color identify the parts that have not been analyzed. The particular colors will change depending on the selected EZTitles theme as follows:
Analyzed parts of the video |
Default theme: light-green; Silver theme: light-blue; Dark theme: pale-gray |
Parts pending for analysis |
Default theme: pale-yellow; Silver theme: pale-yellow; Dark theme: light-red |