To start using the Subtitling assistant you need to load the video in EZTitles and wait for it to be processed - shot changes detected and audio graph completely built up on the Timeline. The processing video file progress bar at the bottom right corner of EZTitles fills up to the end and indicates when the initial processing is completed.
After that you can click on the Subtitling Assistant drop-down and select Start/Resume Audio Analysis from there. Considering that the valid Wallet is already selected, you can check how to do it in the previous topic, you need to select Language from the Audio Language drop-down and press the OK button to start the audio analysis:
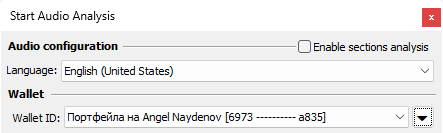
Note: Right now, the Subtitling Assistant works with same language transcriptions only – the language of the original audio must be identical to the language of the subtitles/captions that will be created in the end. Please, make sure to select the appropriate language from the Audio Language drop-down menu.
After pressing the OK button EZTitles will start uploading the audio for analysis. This will be indicated by a progress bar in the bottom right:
![]()
The audio needs to be uploaded first before the audio analysis actually starts.
The Audio Analysis can be stopped only while the audio is uploading, the Stop... button will be grayed out whenever the upload has finished. The audio transcription/speech recognition will begin automatically once the audio finished uploading.
Note: Your wallet will be charged after the audio uploads completely.
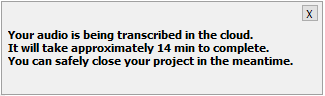
The audio analysis takes some time to complete and the time required will be displayed below the preview list:
as well by the progress bar in the bottom right part of the status bar:
![]()
At this point it isn't necessary to keep EZTitles opened and if the audio analysis takes more than several minutes you can safely close EZTitles or switch to different project in the meantime. The audio transcription will complete and you'll be able to get it next time you open the same video file.
Note: Please mind that the transcription and audio files uploaded to the cloud will be available for limited period only:
▪The uploaded audio file will be deleted as soon as the audio analysis ends;
▪Audio transcription file will be downloaded automatically when the audio analysis has finished and the video is still opened in EZTitles. If you've closed the EZTitles in the meantime, the audio transcription fill be kept available until you reopen the same video file again but for a maximum of 30 days.
▪Audio transcription file will be deleted as soon as it's been downloaded or after 30 days after the audio analysis has been initially started.
As previously mentioned, the audio analysis will be performed after configuring the language. This means that videos with two or more spoken languages will not be processed and analyzed correctly.
The option to Enable sections analysis provides a workaround to this by allowing you to define which parts of the video are spoken in different languages and thus activate the analysis for each of the sections in the correct language:
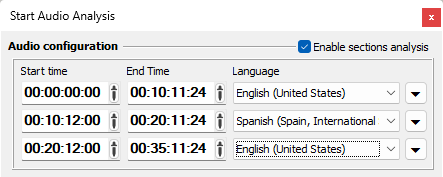
It's possible to add as many language sections as you need as long as they don't overlap in time. If that's the case, the issue will be promptly identified by an "Invalid audio configuration" warning.
After activating Enable sections analysis, EZTitles will automatically create one initial section spanning for the duration of the whole video. To modify its Start Time or End Time points you can either type in the respective timecode value by hand or position the video at the specified point and use the pipette ![]() button to copy the current timecode from the Timeline.
button to copy the current timecode from the Timeline.
To Add new or Remove existing segment press the "arrow pointing down" ![]() button and select the respective option.
button and select the respective option.
Note: It's important to mention that removing already analyzed section will not delete the analysis data for it. Instead, the section will be removed from the configuration but its data will be kept in case it's added back later on.
After the analysis of all configured sections has finished, the Timeline will get colored in light green for the duration of the sections and will mark the parts that have been analyzed by the Assistant. For more details about the different indications, colors and options available for the Timeline, please refer to the following topic.