When the video has been processed, the shot changes are detected and the audio is analyzed, subtitles can be created by using the Subtitles from audio option from the Subtitling Assistant drop-down menu:
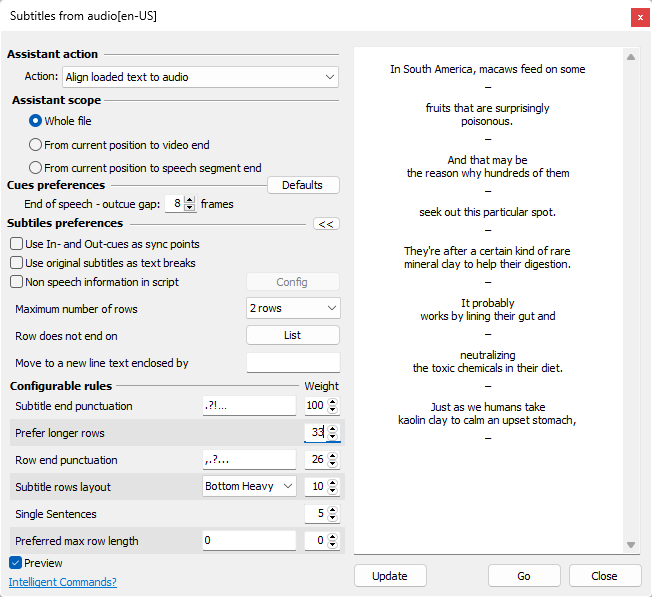
Pressing the Defaults button will revert back to their defaults all options available. Clicking on the Advanced button opens additional rules that can be configured for achieving explicit results.
The Preview checkbox opens the preview panel (the right part of the above image) showing how the text would look like after starting the Assistant with the current configuration. Modifying the rules or changing their weight will not simultaneously update text's preview. It will be updated only after pressing the Update button.
Assistant Action
This section defines the results we want to achieve by using the Assistant and offers the choice between the tasks it can complete or scenarios it can be used in.
Generate subtitles from audio |
This is the most straight forward operation. Using the audio analysis data acquired in the previous step EZTitles automatically generates subtitles and synchronizes them with the audio. |
Align loaded text to audio |
Splits the loaded transcript into subtitles and automatically times (synchronizes) them with the audio. Useful if you already have a Dialogue List, Spotting List or any kind of transcript. Just import the text into EZTitles and use this option. The only restriction for now is that the audio and the script must be in the same language. |
Extract transcription for subtitles |
Consider this option if you already have well-synchronized empty subtitles and need to fill their text automatically. Subtitling Assistant will not modify their timing but will replace their content with the spoken text recognized from the audio. |
Generate timecode for subtitles |
This option can be used if you already have well-arranged subtitles without timecodes and you need just to synchronize them automatically. Subtitling Assistant will not change the text in this case and will only set or modify the timing. |
Although the Subtitling Assistant is an advanced tool we recommend you to always Check the generated subtitles for issues. In addition to the regular Checks, Fixes and Spell Check options, we can also suggest using Find to locate all Commented Subtitles. If the Subtitling Assistant cannot resolve an issue on its own, for example the Assistant couldn't match the part spoken by a character to anything in the loaded transcript, it will still create subtitle but will also add a comment for it with more details about the issue encountered.
Assistant Scope
The scope options define the range of operation of the Subtitling Assistant.
Whole File |
The whole file will be processed at once. Processing the whole file requires some time to complete, usually few minutes if the video is particularly long. |
From current position to video end |
Starts the Assistant from the current video position. If "Align loaded text to audio" is selected the align process will start from the current video position and currently selected subtitle. Make sure to switch to Edit mode first, select the subtitle you want to start with then choose video position from the Timeline somewhere before the selected subtitle's text and then run the Assistant. If the align algorithm finds significant differences between the loaded text and the audio, the whole process will be stopped. If this happens, we suggest correcting the subtitles for the mismatched part and then skip forward to the part where the video and the script are in sync and continue with the Assistant by either using From current position to video end or From current position to speech segment options. Note that if the loaded transcript is timecoded with acceptable precision you can use "Use In- and Out-cues as sync points" option described below to re-sync the algorithm. |
From current position to speech segment end |
The speech segment is best described as a small part of the video with speech containing at least 50 words ending up with at least 2 sec pause in the speech. It works for small parts of the video and almost instantly generates subtitles for them. Then you can quickly review the subtitles, navigate to any position in the video after the last subtitle and run the Assistant for the next speech segment. It can be really handy when tuning various Subtitle Preferences and Rules. Specify the parameters and rules, press Go button and if you are no satisfied with the result use Undo and then adjust the parameters again. Similarly to the previous option, please make sure to select the subtitle you want to start with and after that choose video position from the Timeline prior running the Assistant. |
At the moment there is just one configurable option under Cue Preferences but we plan to add more in the future.
End of speech - out-cue gap |
Specifies the number of frames automatically added to the Out-cue of the last subtitle of a dialogue. Typically, the subtitles composing the dialogue are chained on the minimum interval and the last subtitle in the chain ends up several frames after the audio. The option is set to 12 frames by default but changing the value to 0 frames will switch it off completely. |
Closed Captions
The options are available only when EZTitles is switched to Closed Captions mode in the Project Settings.
CC Style |
Specifies the style (Pop-on, Roll-up or Paint-on) of the automatically generated captions. |
Use In- and Out-cues as sync points |
Available only when Align loaded text to audio is used. If there are significant differences between the loaded text and the recognized audio and the algorithm can't match them it stops. It usually happens if large amount of text is missing in the transcript or there is extra text not present in the audio. If this option is turned on and the loaded transcript is adequately timed the In- and Out-cues are used as synchronization points so the algorithm can continue. As always, the subtitles with possible issues are marked with comments. Note that this will work properly only if the subtitles doesn't contain inconsistent cues i.e. In-cue before the previous Out-cue, In-cue before the previous subtitle's In-cue, etc. |
Use original subtitles as text breaks |
Available only when Align loaded text to audio is used. Use this option if you have subtitles containing large amount of text in each of them and these blocks of text are logically separated. Subtitling Assistant will create subtitles in such a way that there are no subtitles containing text from two different text blocks (subtitles) in the original script/text. |
Non-speech information in script |
Provides options to remove character names, sound effects, on-screen text and any other additional descriptive information not included in the spoken dialogue. More details about NSI and examples is available later in this topic. |
Maximum number of rows |
The Maximum Number of Rows is currently limited to 1 or 2 and it determines how many text lines subtitles can have. |
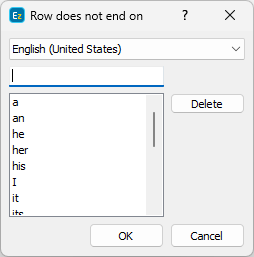
Row doesn't end on |
Allows word to be entered in order to prevent subtitle lines ending with them, for example "a", "an", "the", "that", etc.
For convenience, all entries can be imported from or exported as a simple XML file that could be then shared between workstations or users.
|
Move to a new line text enclosed by |
This option could be really handy when the subtitles contain descriptive text indicated by a special character like the musical note or surrounded by brackets or any other symbol. Text enclosed by the specified symbols will be moved to a separate line, if Max. Number of Rows is set to 2, or to a new subtitle otherwise. If the text is surrounded by two different symbols it is important to enter both of them in the respective field. |
Configurable rules with Weights
The advanced options, found by pressing the ![]() button, can be used to increase the result's precision by modifying their weight to increase or decrease their priority respectively.
button, can be used to increase the result's precision by modifying their weight to increase or decrease their priority respectively.
The weight of a rule can vary between 0 and 100. Rule with weight 0 will have no impact on the final result, i.e. it is disabled. The greater the weight of a rule, the higher its priority becomes. It's also possible to have multiple rules with weight of 100.
Subtitle end punctuation |
The specified punctuation characters will be used as split point and when found near the end of a text line or subtitle all the text that follows will be inserted into a new subtitle. |
Prefer longer rows |
This rule instructs the algorithm to favor creating subtitles that have more characters on each text line. Decreasing its weight will result in shorter, containing less text, subtitles overall. |
Single sentences |
Tells the algorithm to prioritize creating subtitles that contain just a sentence in them. Increasing its weight will result in subtitles primarily containing just a single sentence, while decreasing its priority will result into more subtitles containing text from different sentences. |
Row end punctuation |
The specified punctuation characters will be used as word wrap point and when found near the end of the line all the text that follows will be moved to a new text line. |
Subtitle rows layout |
Allows you to select preferable layout for subtitles containing more than 1 text lines: Bottom Heavy: the bottom line will be longer than the one above. Top Heavy: the first line will be longer than the second one. Squared: aims to create two text lines with equal or close to equal length. Note: the line will be split when it goes outside the safe area or contains more than the allowed number of characters in Project Settings/Safe Area. |
Preferred max row length |
Specifies the number of characters that each text line should preferably contain. This will instruct the algorithm to prefer text lines with this length but it doesn't mean that there will be no lines longer than that. The total length will never exceed the Max. Number of Characters set at Project Settings/Safe Area menu. Use 0 to switch this option off. |
The Non-speech Information options are available only when “Align loaded text to audio” is enabled. The script’s text is searched for character names, sound effects, on-screen text and any other additional descriptive information not included in the spoken dialogue. Then you can decide if they should remain in the final version of the subtitles.
Configure Non-speech information
Pressing the Config button opens the following dialog:
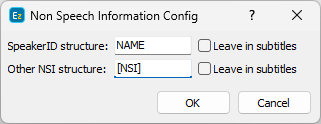
Speaker ID
As the name suggests, Speaker ID is used to identify the speaker. When the text is processed new speakers will be moved to a new subtitle or to the beginning of a new line.
Speaker ID can be distinguished using the NAME or name wildcards which are case sensitive.
NAME will match any text in uppercase containing words longer than one symbol. The wildcard can be used alone or surrounded by other tags/symbols like: NAME:, [NAME], (NAME), etc.
For example, if we have the following:
MAN IN CAR: I’ve got something for you.
JACK: Oh, boy…
The Speaker ID can be configured just as "NAME:".
The lowercase variant "name" will match any uppercase or lowercase letter. It must be surrounded by additional identification tags/symbols like parenthesis: (name), square brackets: [name] or anything else suitable for the case at hand. Otherwise, the parameter will be ignored because it will match pretty much every word in the script.
Consider the following example where the Speakers are in sentence case where the wildcard shall be configured as "[name]:" instead:
[Man in Car]: I’ve got something for you.
[Jack]: Oh, boy...
We cannot use the NAME wildcard because the "Man in Car" and "Jack" IDs contain both capital and lowercase letters. Enclosing the lowercase wildcard in square brackets and adding colon after the right one will only ensure that just the Speaker IDs are picked off.
Other NSI
Includes sound effects and any other information not included in the speech.
Other non-speech information events or simply NSI can be handled by the NSI case-insensitive wildcard.
The only limitation is that it must be surrounded by other identification tags/symbols to work properly like, for example, parenthesis: (NSI), square brackets: [NSI], hash-tag: #NSI#, etc. Otherwise, if used alone, the parameter will be ignored because it would match every word in the script.
Additionally, you can decide if the Speaker ID and/or other NSI will be kept in the text by selecting the Leave in subtitles option.
NSI in the middle of the line will not be changed, as long as Leave in subtitles is ticked off:
I (laughs) fully intend to!
When the NSI is placed on a separate text line:
Good bye!
[Door Slams]
it will be moved to a new subtitle with zero duration because the Assistant cannot guess how long the event should be. We recommend doing Check against “Inconsistent Cues” to spot and identify all such subtitles.
Regular Expression syntax
If using the wildcards described above is not enough you can use Regular Expressions for both parameters. Just add "(?re)" before the expression. For example using "(?re)[\w\d]+##" will match any alpanumeric sequence followed by two "#" symbols. Detailed description of the Regular Expression syntax is available here.