Requirements
Before activating cloud integration for EZTitles you first need to install DropBox and then successfully sign in it on your computer.
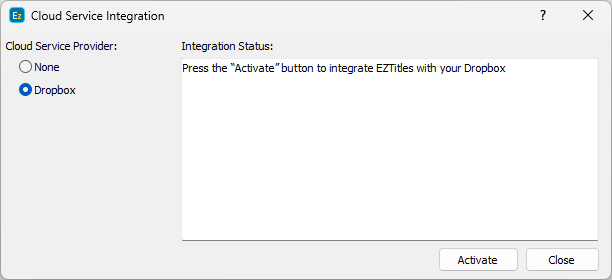
Activation
After that from the Edit/Cloud Services menu you can proceed forward and integrate EZTitles with DropBox by pressing the Activate button.
EZTitles will then take you through a couple of verification and authentication steps and will require you to enter your registered e-mail address and password for the specific cloud service.
Note: By activating the cloud services integration you are granting EZTitles permissions to access the files on your cloud storage. EZTitles does not store or access your password and does not use your username, e-mail or password for any purpose other than to verify you have entered correct credentials.
It is possible for the integration to fail during a number of conditions the most common of which are:
▪general issues with the network or internet connection;
▪temporarily unavailable DropBox service;
▪switched off or paused cloud service application;
▪incorrectly entered username and password;
▪difference between the user authenticating EZTitles with the cloud service and the currently signed in user in the cloud application and so on.
In this case EZTitles will display a number of suggestions or options how to resolve the issues.
Finally, upon successfully integrating, you'll receive a confirmation message and a new cloud looking icon ![]() will appear in the program's caption bar to indicate it. EZTitles will then instantly initialize its working environment on DropBox's storage. All settings and private files are stored in \DropBox\EZTitlesDevelopmentStudio\ folder.
will appear in the program's caption bar to indicate it. EZTitles will then instantly initialize its working environment on DropBox's storage. All settings and private files are stored in \DropBox\EZTitlesDevelopmentStudio\ folder.
When you integrate EZTitles for first time it will copy all your settings, dictionaries, project templates and Zero Subtitle templates from your local settings account on the cloud storage.
Note: If you have already activated the cloud services integration and you are joining EZTitles on a second workstation the program will detect that you already have settings on the cloud storage and will offer you the following choice:
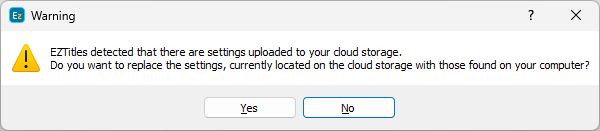
Clicking on the Yes button will replace the settings from the cloud storage with the currently existing on your computer.
Answering with No will not replace or remove anything and will make EZTitles start using the settings from the cloud folder directly.
If you're not sure which are the most recently changed and up-to-date settings it may be a good idea to back-up in advance the contents of:
\DropBox\EZTitlesDevelopmentStudio\EZTitles7
EZTitles will keep your subtitle and video files synchronized on all your devices as long as they are saved in the DropBox's home folder.
One of the greatest advantages of using EZTitles integrated with a cloud service is that the program automatically tries to keep the subtitle files in sync and verifies if you're working with the most recent revision of a subtitle file or the most up-to-date settings and project templates are loaded in.
If any sort of a problem occurs while EZTitles is running and the cloud synchronization becomes unavailable, the cloud integration status icon will indicate it by changing to ![]() . However, there's nothing to worry about because EZTitles will automatically resume the synchronization after the problem is being resolved and all the modifications that you made to the files will be simultaneously updated on the cloud storage as well.
. However, there's nothing to worry about because EZTitles will automatically resume the synchronization after the problem is being resolved and all the modifications that you made to the files will be simultaneously updated on the cloud storage as well.
The program also provides a couple of options, available at Edit/Preferences/Performance, to verify if it works with the most recent settings or files during start up or if the file you're about to open is up to date.