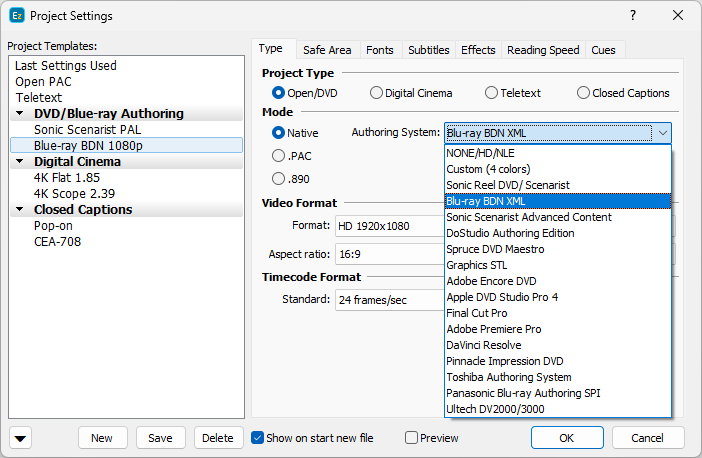
Project Settings/Type sub-menu is provides some of the more general configurations for your project allowing you to select Project Type, Mode, Video Format and Timecode Format. Project Type and Mode are essential for the final look of the subtitles, while Video Format and Timecode for the synchronization between the subtitles and the video.

Project Settings - Type Page
Project Type
Here you can choose whether you will work with Open/DVD, Digital Cinema, Teletext subtitles or Closed Captions.
Open subtitles |
Open subtitles are integrated into the TV picture at the TV station before the TV signal is broadcast. This allows the viewer's to see subtitles without a special decoder on their TV sets. However, this method allows broadcasting subtitles in just a single language simultaneously. |
DVD / BD (Blu-ray) subtitles |
The subtitles on DVD and Blu-ray discs are not burnt in the picture instead they are usually added to the disc as a set of compressed images with transparency. The DVD/Blu-ray player reads the subtitles from the disc and overlays them on the picture using transparent background. You can have subtitles in many different languages on a single disc. |
Subtitles for Digital Cinema |
Subtitles for Digital Cinema must follow a specific set of rules and standards accepted and enforced by the motion pictures community. The Digital Cinema mode fully complies with the existing standards and most of the parameters will automatically be used by the DLP Cinema XML and SMPTE export options during the subtitles export. We strongly recommend you to always switch to Digital Cinema mode when you need to deliver your files as subtitles for Digital Cinema. |
Teletext subtitles |
Teletext subtitles are transmitted as teletext data in the hidden part of the TV transmission. The teletext subtitle data is decoded by the teletext decoder in the TV set and then displayed on the screen. Each viewer may decide whether or not he wants to see it. If the viewer wants to read the subtitles, he simply needs to select his language specific subtitle page on the teletext decoder. This method of subtitle transmission is widely used in Europe. |
Closed Captions |
Closed Captions are broadcast in the invisible part of the TV transmission and the TV set decodes and displays the subtitles. Closed captions are used mostly in North America. |
More details about the available configuration options for each of project type are available in the dedicated topics:
The Project Mode is intended to address certain specific issues connected with the target equipment and file format. The available modes will change for the different project types, so please make sure to check the dedicated topics too:

Video Format and TimeCode Format
Video Format |
The video format defines the display resolution of the project. The PAL and NTSC options also comply with the respective European (PAL) and American (NTSC) TV video standards. Please note that selecting one of these options will limit the project's frame rate as PAL signal is transmit in 25fps only, while NTSC - in 23.976fps or 29.97fps (DF or NDF). EZTitles offers a few of the most commonly used HD/UHD presets, 2K/4K container formats for Digital Cinema projects and an option to start a project with Custom resolution. When starting project in Custom resolution you can specify non-standard video width and height with pixel aspect ratio of 1:1. This could be useful, or even required, when you need to deliver subtitles rendered as images. Pixel Aspect Ratio of project in Custom resolution will always be 1:1 which also means that the Aspect Ratio will be defined by the specified width and height. Width and Height values for the custom resolution can vary in the range of 128xp - 8192px. To avoid any issues, entering a value outside the allowed range will reset both width and height to 1920px and 1080px respectively. |
Frame Rate |
Sets the frame rate of the project. It must match the frame rate of the video that's going to be loaded. EZTitles provides additional methods frame rate conversion. As mentioned earlier, different frame rates are available for the different formats: PAL - 25fps NTSC - 23.976fps, 29.97fps. UHD, Custom and all HD presets: 23.976fps, 24pfs, 25fps, 29.97fps, 30fps, 50fps, 59.94fps, 60fps. 48fps is available for Digital Cinema projects only. |
Timecode Format |
Timecode is a method for representing the consecutive video frames as a sequence of temporal codes. EZTitles solely use SMPTE Timecode in HH:SS:MM:FF format. Usually, Timecode Format is pre-determined by the selected frame rate or Video Format. But there are some notable exceptions: 23.976fps is measured as 24fps, 29.97fps can be measured in 29.97fps Drop-Frame (DF) or 29.97 Non Drop-Frame timecode format. |
Aspect Ratio |
The Aspect Ratio is the ratio of the image's width and height. If it is set correctly to match the ratio of the video file the image will be displayed correctly, without being stretched or crippled in any way. |
Letterbox |
Letterboxing is the method used to display widescreen movie on a traditional 4x3 screen. Two black mattes will be inserted above and below or to the left and right (i.e pillarbox) of the picture if you decide to use this. If the opposite is required, i.e. to remove the black mattes in case of 16:9 picture embedded in 4:3 you may considering using Video Crop. |