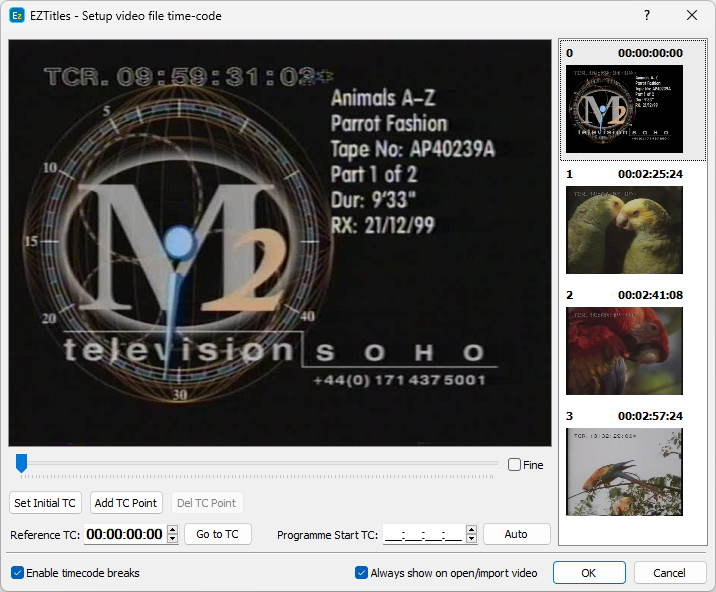
When you open/import a video file or start a video file capture, the Setup Timecode dialog described below appears.

Setup Timecode Dialog
Here you can set the timecode by hand. You should enter the burnt-in timecode seen on the picture in Reference TC field at the bottom of the dialog. The scroll underneath the video is used for choosing the displayed video frame if the first one is not readable (in fact, it is very likely that the first few frames of a video file have inaccurate timecode and we advise you to scroll to a random position in the file and use the timecode displayed there).
Fine check box is used to scroll the video more precisely. First, without checking fine, find the approximate position you are interested in. Then click Fine and find the exact frame you need.
Programme Start TC - by definition this is the first frame of the video which is intended for transmission. It might be different from the first frame of the loaded video if there is a leading part at the beginning. For convenience, you can use the Auto button to automatically pick the closest hour. For example, the clip from the picture above starts with a leading from 09:59:13:03 and pressing the Auto button will set the programme's start time to 10:00:00:00.
You can leave the Programme Start TC empty when the clip doesn't start with a leading.
Note: The calculated Video Start Timecode and Programme Start TC will be saved in project's details and can later be used to Recut/Offset the output during the export or to automatically fill the Programme Start TC/Start of Message parameter when exporting EBU STL or 890 for instance.
Always show on open/import video - as the name of the option suggests, turning it on will always display the Setup Timecode dialog when opening or importing video files. Even when the video file carries embedded timecode track in it.
Timecode Breaks
The Enable timecode breaks feature is provided in case the timecode in the video file is not continuous. This could be because a few episodes are recorded on the same tape, there are dropped frames, etc. When this option is selected, the layout of the setup timecode window is changed:
Set Initial TC button is used to set the timecode of the beginning of the movie. Locate a point somewhere in the beginning, enter its timecode in Reference TC field and press Set Initial TC. Now you are ready to enter the other points.
Locate the frame where the timecode changes, enter the new value in Reference TC field and then press Add TC Point button. List of the defined timecode points is displayed on the right side of the window.