Import Closed Captions files
The import procedure is similar to the one described earlier. Use File/Import... menu or ![]() toolbar button.
toolbar button.
Standard Windows open dialog is displayed containing files in all supported by EZConvert formats.
There is an "Append" check box at the bottom of the dialog which you can select if you want to append the imported file to the current subtitles. If for some reason the program can't recognize the file format you can use File/Advanced Import... menu as described in Import Subtitles topic.
Importing of some Closed Captions dedicated formats (CIN, SCC, NCI CAP, ULT, TDS, ProCAP, FLC - NCI Roll-Up captions) will display additional option when the project is configured for 23.976fps:
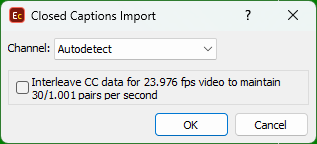
Channel - This option is available only when importing SCC files and allows EZConvert to read/import the data from one of the four CC data channels when different data is saved in them. The Autodetect option is sufficient for the most common case when the SCC file contains captioning data on one of its channels only.
Interleave CC data for 23.976fps video to maintain 30/1.001 pairs per second - changes how caption's timings are calculated for 23.976fps in accordance with the CEA-708-B standard.
When the option is turned on, 3 pairs of CC data will be encoded for every other frame. And when it's turned off - 2 pairs of CC data will be encoded for every video frame. Or in other words, turning the option on allows 25% more text to be decoded over the same period of time which also accounts for decreasing the "time to process" required for each caption.
Note: Whether the option is clicked on or off by default depends on how the same option is configured at the Project Settings/Safe Area menu. We don't recommend turning the option on when it isn't turned on in the Project Settings. And vise-versa.
Export Closed Captions files
When the Export command is selected from the File/Export menu or ![]() toolbar button is pressed, the following dialog box appears:
toolbar button is pressed, the following dialog box appears:

Export Closed Captions files
Here you can choose the format into which you'd like to export the current file. Then you have to click the Export button to proceed.
Depending on the type of the captions file you'd like to export to, you will be asked to adjust some of these settings:

Closed Captions Export Configuration
With the Mode section you can choose to prepare the subtitles for the Closed Captions CEA-608, TeleCap I or TeleCap II modes. Differences between these modes are described in the Project Properties section.
Depending on your choice for Channel, the prepared subtitle file will be inserted in one of the two data channels used with the Closed Captions.
Export in upper case will output a file which text contains only UPPER case letters.
Double control codes - the control characters are duplicated to ensure correct transmission.
Export extended character set - enables the use of characters from the Line 21 extended character list set. If not selected and there are extended characters in the captions you will receive an error message.
Blank between pop-ons - the default value is 2 frames.
Interleave CC data for 23.976fps video to maintain 30/1.001 pairs per second - changes how caption's timings are calculated for 23.976fps videos in accordance with the CEA-708-B standard. The option is available when exporting into the following file formats: CIN, SCC, NCI CAP, ULT, TDS, ProCAP, MCC and FLC - NCI Roll-Up captions.
When the option is turned on, 3 pairs of CC data will be encoded for every other frame. And when it's turned off - 2 pairs of CC data will be encoded for every video frame. Or in other words, turning the option on allows 25% more text to be encoded over the same period of time which also accounts for decreasing the "time to process" required for each caption.
Note: Whether the option is clicked on or off by default depends on how the same option is configured at the Project Settings/Safe Area menu. We don't recommend turning the option on when it isn't turned on in the Project Settings. And vise-versa.
For SCC formatted captions a few additional options will appear:
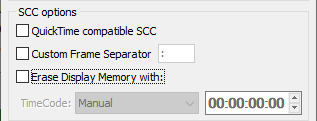
QuickTime compatible SCC - the output caption file could be played under Mac OS via QuickTime player with ClosedCaptionImporter filter installed. Please note that if you are producing 23.976fps SCC files, you shall make sure that either 30fps Drop or Non-Drop has been selected on the TimeCode Format drop-down.
Custom Frame Separator - enables you to specify custom symbol to separate frames from seconds of the timecode in the output file. Colon (:) is used as the default symbol.
Erase Display Memory on Programme Start - Enables insertion of Erase Display Memory (EDM) control code at the selected Programme Start Timecode(see below). This may be needed by certain equipment and applications, like QuickTime, to correctly keep Closed Captions data in sync with the video playback.
Programme Start Timecode
Manual |
Enables you to manually type in EDM's timecode. |
Auto |
Automatically sets the Programme Start timecode using the first subtitle's In-cue rounded down to the closes hour. For example, if the first subtitle starts at 10:00:32:21 EDM's value will be automatically set to 10:00:00:00. |
Programme Start TC |
automatically subtracts the value of the Programme Start TimeCode metadata parameter if available in the input file. Note that this parameter is supported for EBU STL, EBU-TT, EZT or EZTXML file formats only. |
Video Start TC |
automatically gets video's start time from the input EZT or EZTXML file. |
This option can be used for two things.
First, when Erase Display Memory... is enabled, it'll insert EDM control code at the specified timecode.
And second, if Erase Display Memory is disabled, it'll verify if the first caption in the file can be loaded in time, i.e. will perform Time to build check for the first caption, according to the specified programme timecode. If the first caption cannot be loaded in time, then it's in-cue will automatically be moved forward to ensure correct display for it.
Favorites
The user can create list with the"favorite", most frequently used, formats for import or export by clicking the bullet on the right side of each particular format. To remove any of them from the favorites category it's only necessary to click on the bullet again.
Range
EZConvert does also provide unique function that allows you to select how many and which subtitles will be saved to the exported file by using the options that will show up after pressing the Range button.