Quite often there are more than one shot changes for the duration of single subtitle which leads to another 3D specific problem. If a subtitle is displayed on the screen during the first scene and is perfectly positioned for it, this may not be the case for the next scene. To prevent such issues from ruining the whole 3D viewing experience, 3DTitles has a special ability to divide the subtitle into a number of segments.
The depth of each segment can have different value according to the new points of interest on the screen to ensure the subtitle will appear perfectly positioned for each one of the shot changes.
If the segment didn't exist on the above picture, the depth would have been the same throughout the subtitle and would have resulted into eye discomfort for the duration of the last scene.
To insert new depth segment you need first to position the video at that point and then press Alt+Num Ins shortcut. All along with this it will estimate the depth for the new segment.
All techniques for changing the depth discussed within the previous topic will affect only the current segment. For instance you can position the video at a more appropriate point of interest and then press Alt+Num Enter to set the subtitle depth based on this frame in the movie.
Using the Move Depth Segment Left/Right commands (with default shortcuts "." and ",") you can move the segment by one frame in the desired direction. In addition only the start or end point of the segment can be adjusted by pressing and holding the Ctrl (for the start point) and Alt (for the out point) and using the Move Depth segment Left/Right commands:
, – moves the start point of the current segment one frame to the left;
. – moves the start point of the current segment one frame to the right;
Alt + , – moves the end point of the current segment one frame to the left;
Alt + . – moves the end point of the current segment one frame to the right.
Note: Position on the first frame of the next shot and then press Alt+Num Ins. Thus the subtitle will be changed with the shot change.
Use Alt+Num Del keyboard shortcut to remove the current segment.
3DTitles has no restrictions over the number of segments a subtitle can be divided into.
Smooth transition segments can be used when the object of interest is changing its position significantly in the Z direction while the subtitle remains on screen.
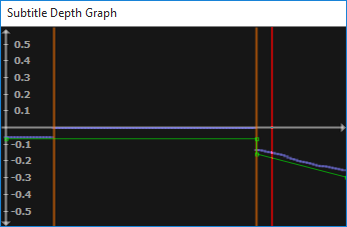
To make the whole subtitle, or particular segment only, gradually change its depth you can use the Convert to Smooth Segment command Alt + Shift +Num Enter at the position on the graph with the highest or lowest depth. Respectively, the green line indicating subtitle's depth, will appear angled towards the X axis, as shown on the image above.
In addition the following commands can be used to manually adjust the smooth segment's depth :
Ctrl + Num+ – moves the segment's start point further (inside screen) at small step of 0.01 units;
Ctrl + Num- – moves the segment's start point closer (outside screen) at small step of 0.01 units;
Alt + Num+ – moves the segment's end point further (inside screen) at small step of 0.01 units;
Alt + Num- – moves the segment's end point closer (outside screen) at small step of 0.01 units.
If you need to change the depth in greater steps (0.1 units), you can also press Shift and use any of the above commands. You can find more about how the depth is measured at this topic.
Note: Not all file formats available for export support smooth transition segments. Currently they can be used with the Blu-ray BDN XML, EDL, SMPTE 428-7-2014, Final Cut Pro X and DoStudio 3D export options as well as for encoding subtitles by our Adobe Premiere® and Avid® Media Composer® Plug-ins.